Showing posts with label wine cork crafts. Show all posts

Saturday, March 31, 2018

How To Make a Driftwood Mirror

I've been searching for a driftwood mirror for my guestroom.
Something like this.


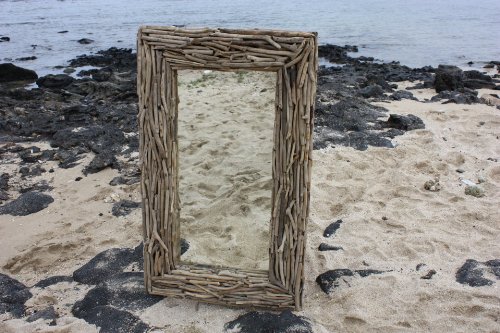
(Ah . . . advertising images. Don't you wish mirrors came out of the sea just like this? We could just walk the beach and collect them, already done!)


The driftwood mirrors I've looked at have been expensive. Pottery Barn has one, but the sale price is $423.00. This one is available at Amazon for $180.00 + $22.00 shipping. Not too bad.  
Related image


But I like a bargain. So I decided to make my own.
I'm lucky to live in Maine . . . 


 where it's easy to find driftwood on the beach.


I found a very heavy old mirror at Goodwill for $2.00. The maple frame was scratched but sturdy.


Aside from that, all that is needed is a glue gun.


I did burn my fingers quite a bit completing this project. Since  then, I went online and discovered these for $5.98 on Amazon. I haven't used them yet but have heard from other bloggers that they work, so I'm anxious to try them.

download

I looked for pieces of driftwood with interesting shapes, colors and textures.


And just hot-glued them to the old mirror frame.


That's it!
Total cost:  $2.00 plus a few glue sticks.


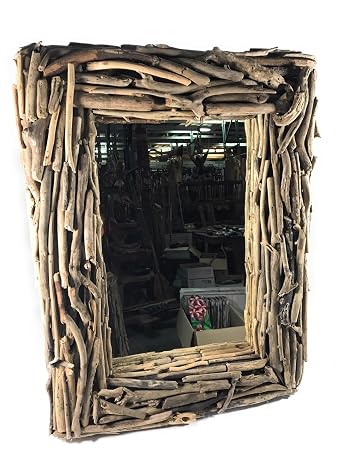
I love how the mirror came out!

It would be just as easy to do this project on a round mirror frame if that works better in your room.  Something like this .


If you don't have access to driftwood where you live, you could do a similar project with clothespins.
I love using them for projects with a farmhouse look.


Kirsty's Clothespin wreath, below (click link for tutorial) , could be made around a mirror. She used Washi tape on the clothespins. If they're old ones, I'd might just use them just as they are.

Hambly wreath - Photo 1

 A few years ago, I used my trusty glue gun to make a Button mirror . .  no beach required! This one was a little more time consuming but vintage buttons are fun. They're available everywhere, in shiny metals, unusual shapes and vintage colors. 


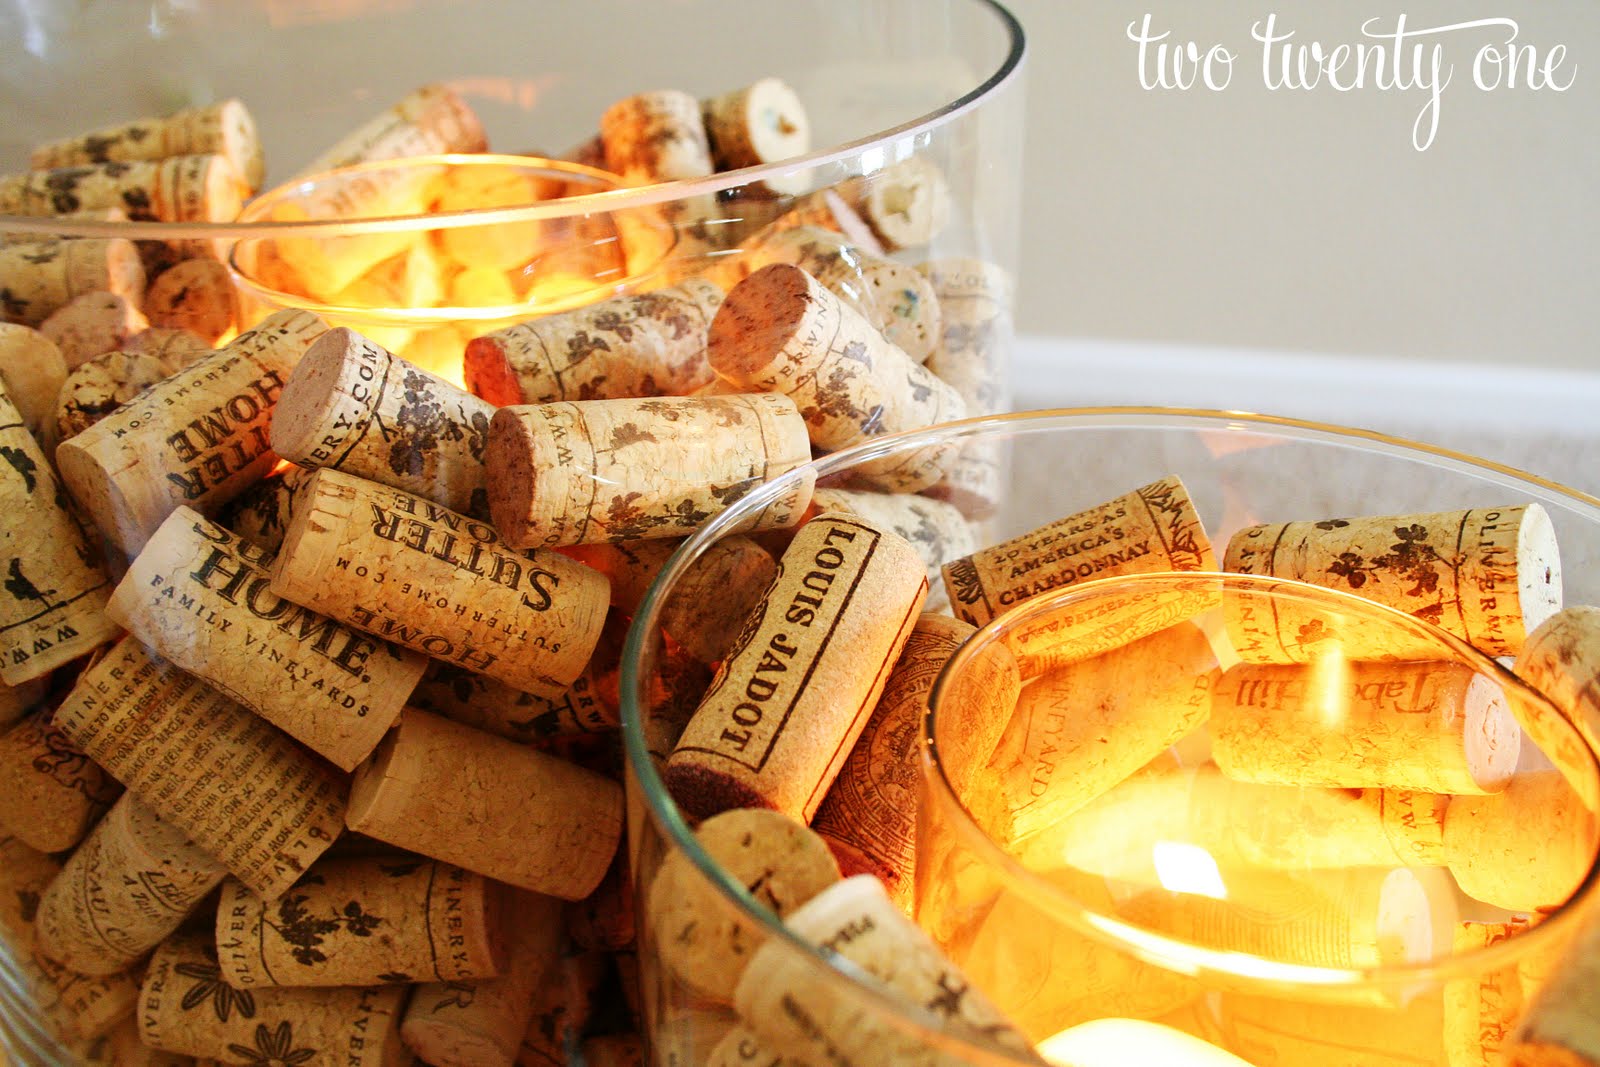
So, there you have it.  A simple project you can complete in an afternoon.  Or in an evening with a friend and glass of wine . . .


In which case, if all else fails, you can gather up your corks and make this!


Happy gluing!


This post is linked to:
Salvaged Junk Projects 421 at Funky Junk Interiors
Spring & Easter Blogger Link Party at Common Ground
Farmhouse Friday Link Party at The Painted Hinge
Flaunt It Friday at Chic On a Shoestring
Nifty Thrifty Sunday #328 at Nifty Thrifty Things
Happiness Is Homemade Link Party at The Painted Hinge
Craftastic Link Party at Sew Can Do

Saturday, November 22, 2014

DIY: Closet to Martini Bar

What do you do with an underutilized kitchen closet? Well, if you're my very handy friend, Mary Elizabeth, you transform it into a martini bar!

After
 If you've been reading this blog, you know that I've been helping Mary Elizabeth update and repaint her house. We were taking a lunch break in her kitchen one day and the door to the little closet off of the dining area was open.  That's all it took to get our creative juices flowing!

Before
 Since Mary Elizabeth loves  martini's, we got a crazy idea:
Why not transform the little "junk closet" into a functional (and fun!) "Martini Bar"?

During
And what better martini-inspired color to use than . . . ta da . . . "OLIVE green!
 

Shelves were removed, cut down, painted and repositioned.
 
 
Mary found the mirrored tiles for the back of the bar at Goodwill and installed them herself (she's a whiz with power tools!). She also installed battery operated lights and painted the insides of the door with chalkboard paint. Better to post her "Martini Menu" on!


Mary Elizabeth is still planning to hand-paint olive borders on the trim around the chalkboards but otherwise Applegate's newest Martini Bar is ready to open . . .

 
And I plan to be the first customer!
 
 
p.s. In a comment about my recent post on wine cork crafts, blogger Donna from Distressed Donna Down Home wrote, "I thought surely you would create some sheep, a donkey and the Wise Men for the nativity scene". 
So Donna, this is for you!
(And yes, I know my sheep bears a strong resemblance to a llama . . .).
 

This post is linked to:
Party Junk at Funky Junk Interiors
Nifty Thrifty Sunday at Nifty Thrifty Things
Show & Tell Friday at My Romantic Home
Metamorphosis Monday at Between Naps On the Porch
Make It Monday at Distressed Donna Down Home

Monday, November 17, 2014

Don't Put Those Wine Corks Away Quite Yet!

I decided to try making a few reindeer while I was working on the wine cork Nativity figures over the weekend.


I first saw these on Pinterest at the Homeless Finch blog.

 
I changed them out a bit, using sticks for legs, neck and antlers. These were simple . . . no tutorial needed. The hardest part was making holes in the corks that would allow the sticks to fit snugly. I ended up using my awl and securing them with a dot of hot glue.
 
 
I plan to use these little reindeer on the porch of our log cabin dollhouse when I finish decorating it for Christmas.
 
With my remaining corks, I'm going to try this idea from Chelsea at two twenty-one:
 
 
Such a warm accent for the holidays and so simple!


Two more great excuses to drink wine!


This post is linked to:
Make It Monday at Distressed Donna Down Home
Motivate Me Monday at Keeping It Simple
Show & Share at Coastal Charm
Metamorphosis Monday at Between Naps On The Porch

Saturday, November 15, 2014

Wine Cork Nativity Tutorial

I had so much fun making these little nativity sets that I thought I'd share a tutorial.
They would be fun to make with grandchildren or in a Sunday school class.


I plan to give mine as little gifts. (Full disclosure: they're so cute, I'm keeping one set for my mantle.)


Why a wine cork nativity? When our friends Anita and Fred downsized to an RV (lucky them!), I was the recipient of a huge bag of wine corks they had collected over the years . . . lots of years judging by the size of the bag!


So I headed to Pinterest for some "wine cork crafts" ideas and found this photo on an Italian blog called Creamamma. It was love at first sight! I knew I had to make these. The blog is written in Italian but Google Translate took care of that. There was no tutorial so I just used the photo and figured out my own way of making the figures.  


I started by purchasing a couple of inexpensive packages of small wooden doll heads at JoAnn's Crafts These are optional; the blogger in Italy did not use them. She used champagne-type corks with wide tops but I didn't have enough of those.


I made a platform with thumbtacks sticking up between two layers of corrugated cardboard, set my corks out on it, and sprayed them with white primer. You can skip this step for the nativity but I am planning on painting some of my corks for future projects so I just primed them all.


Then I hot-glued the heads on.
(Children could do this with craft glue.)

I played around with a piece of fabric until I came up with a simple pattern for the felt robes. Here is the shape that worked for me. My pattern is approximately 3 inches tall and 4 inches wide.

I hot glued the felt "robe" to the head first, then just folded the two sides over each other in the front and glued the robe shut. (Oh dear, just realized it looks as if Mr. Winecork is flashing us - pretty funny but totally unintended!)
 
To make the baby, I cut a Q-tip into a piece a little over an inch long and wrapped it in a small square of felt - like you would swaddle a real baby. A little glue holds the "blanket" shut in front.

I glued on a little face out of tiny circle of flesh-colored felt and drew on eyes and mouth with a thin Sharpie. The cradle is another cork cut in half lengthwise; a serrated kitchen knife did the job. Another dab of glue holds the baby in the crèche.


Finally, I tied gold cord around each figure - as a belt on Joseph and around the neck or head for Mary.


These are quick to do.
Once I had the materials together, I was able to make four 3-piece sets in an hour.
 

The set I decided to keep is already on the mantle on a piece of fleece "snow" next to the little LED tree I found at Goodwill yesterday.
 

So very simple and sweet.
 
Enjoy!


This post is linked to:
Party Junk at Funky Junk Interiors
So Darn Crafty Party at Sew Many Ways
Show & Tell Saturday at Be Different, Act Normal
Make It Monday at Distressed Donna Down Home
 Link Party Palooza at Tattertots & Jello
Found & Foraged Linky Party at House of Hipsters
Sunday Showcase at Under the Table and Dreaming by SL
Show & Share at Coastal Charm
Metamorphosis Monday at Between Naps On the Porch
Related Posts Plugin for WordPress, Blogger...