Saturday, April 7, 2018

Chair Project: Changing My Mind

Do you ever finish a project and dislike it?  Or totally change your mind about how it should look?  Happens to me quite often.  Darn . . .more work!  I redid this Goodwill chair on Tuesday.  Last night, I ripped the cushion apart and totally remade it. 


This time, I repurposed one of  Wednesday's Target finds, a large flour sack towel from Joanna Gaines' "Hearth & Hand" Collection, for the fabric.  With careful positioning, I just managed to get one seat cushion out of each 30" square towel.
                                           

Here is how the chair looked after my original re-do.


As I lived with it for a day or two, I decided that I fabric I originally chose was just too orangy-pink, and too shiny,  for my kitchen.


So here it is this morning. 


More muted. More textured.
 I like it much better.


The gold in the chairs encouraged me to add some daffodils to the kitchen.  I got out a few of  Wednesday's Target "Dollar Spot" Finds, the tray and the cake stand, and made a quick vignette.
The vintage ceramic animals were purchased by my parents on their Honeymoon in 1946.
I'm so happy to have them.


 I guess that for those of us who love working on our homes,
 sometimes it's O.K. to change our minds.

Does that ever happen to you?


This post is linked to:
Salvaged Junk Projects #422 at Funky Junk Interiors
Monday Link Party at Sew Can Do
Happiness Is Homemade #215 at The Painted Hinge

Thursday, April 5, 2018

Target Farmhouse Decor Under $30.00

I've been in the mood for some Spring decorating, so I stopped in to Target today to see what was new. I thought I'd check out the "Magnolia" collection for some inspiration while I was there.


I had barely made it ithrough the door when I had five items in my cart . . . all from the "Dollar Spot".
Who knew?  I hadn't expected to find any "decor" there but take a look . . .


The teakwood tray (10" x 14") was $5.00 and came in either natural or whitewashed. I love arranging seasonal vignettes on trays and this one is the perfect size.
Then I saw these tall (9") tin olive baskets with copper handles . . . only $3.00 each. 
I bought two!


 I was on a roll now!
To add height to my vignette, I grabbed a white cake stand, for $5.00. . . 
still in the "Dollar Spot". 
Four great finds for $16.00!


In the home section, I added this little clear vase for $3.99 . . . perfect for sprigs of spring flowers on a tray or windowsill.


I did finally make it to the "Hearth & Hand" section to see what Joanne Gaines has come up with for Spring. I loved these big flour sack towels (30 inches square with black, coral, or gold stripes) and at only 3.99, I got two. I often use fabric to add softness and texture to an arrangement on a tray or antique piece.  Or, if I'm not feeling creative, I can just use them to dry dishes!


 Total for all seven pieces = $27.97!

After all the errand-running, I had lost my energy by the time I got home so my Target finds are all sitting in the dining room waiting to be arranged. 


Since Joanne Gaines doesn't live here, I'll hope for a new burst of farmhouse inspiration and arrange them tomorrow!


This post is linked to:
The TFT Party at Katharine's Corner
Wow Us Wednesday #381 at Savvy Southern Style
Flaunt It Friday #397 at Chic On a Shoestring
The Farmhouse Friday Link Party #51 at The Painted Hinge
Amaze Me Monday at Dwellings
Nifty Thrifty Sunday at Nifty Thrifty Things

Wednesday, April 4, 2018

$4.00 Goodwill Chair Re-do

We have a little thumbback chair in our kitchen that was originally in the old farmhouse in Virginia where DH's father grew up. I've been looking for another one of similar size and style to pair with it. I found this one yesterday in a quick "walk through" of Goodwill. For $4.00, I grabbed it.


The chair was solid but the wood finish needed some work. 
The chair seat was woven with old men's ties. Remember when that was a popular DIY project?


When I have a new project in mind, I can't wait to get started. Within an hour of getting home with the groceries (and chair!), I had given the wood frame a good cleaning and used MinWax Wood-Sheen on it to restore the finish.


I cut a pattern out of brown paper so that I could sew a new seat cushion to cover all those ugly ties!


I had enough fabric and batting in my stash to make matching cushions for the "new" chair and the one we already had. Another hour and they were done.


Here is the finished chair.


I didn't even replace the men's ties; just placed the new cushion right over them.


By late afternoon, this project was done.


Just in time for a cup of tea glass of wine!


This post is linked to:
Wow Us Wednesdays at Savvy Southern Style
The Farmhouse Friday Link Party #51 at The Painted Hinge
Salvaged Junk Projects #422 at Funky Junk Interiors

Monday, April 2, 2018

Mr. Rogers Would Love This!

On March 23rd, Mr. Rogers got his own "Forever" stamp.


What a perfect tribute to a man who provided such a calm, safe "neighborhood" for young children to visit for a half hour every day on PBS. His show ran from 1968 to 2001.


When my two children were little in the late 70's and early 80's, they loved watching Mr. Rogers. Every show started exactly the same way:  Fred Rogers would come in, change his shoes, put on his sweater and sing that "It's a beautiful day in the neighborhood". The trolley would CLANG and the kids were swept away to the "Land of Make Believe" to follow the adventures of familiar characters like King Friday and Daniel Tiger.


Each story would have a lesson which Mr. Rogers would impart in the slow, gentle, reassuring voice that was his hallmark.


One of my adult children has disabilities and still enjoys the quiet, daily predictability of a visit to Mr. Rogers' neighborhood. 


For all the joy he brought to our kids, I'm thrilled that Mr. Rogers has been honored with a stamp. I'll happily buy enough to last me for awhile. . . And then maybe I'll pretend that Mr. McFeely will come to my neighborhood to pick them up for "Speedy Delivery"!

Thank you, Mr. Rogers.
'Nuff said.


This post is linked to:
Metamorphosis Monday at Between Naps On the Porch

Saturday, March 31, 2018

How To Make a Driftwood Mirror

I've been searching for a driftwood mirror for my guestroom.
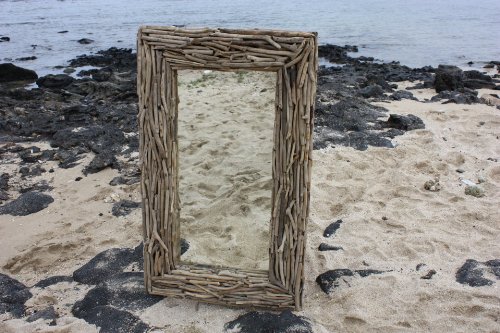
Something like this.


(Ah . . . advertising images. Don't you wish mirrors came out of the sea just like this? We could just walk the beach and collect them, already done!)


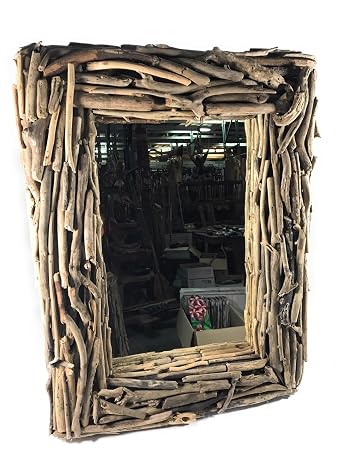
The driftwood mirrors I've looked at have been expensive. Pottery Barn has one, but the sale price is $423.00. This one is available at Amazon for $180.00 + $22.00 shipping. Not too bad.  
Related image


But I like a bargain. So I decided to make my own.
I'm lucky to live in Maine . . . 


 where it's easy to find driftwood on the beach.


I found a very heavy old mirror at Goodwill for $2.00. The maple frame was scratched but sturdy.


Aside from that, all that is needed is a glue gun.


I did burn my fingers quite a bit completing this project. Since  then, I went online and discovered these for $5.98 on Amazon. I haven't used them yet but have heard from other bloggers that they work, so I'm anxious to try them.

download

I looked for pieces of driftwood with interesting shapes, colors and textures.


And just hot-glued them to the old mirror frame.


That's it!
Total cost:  $2.00 plus a few glue sticks.


I love how the mirror came out!

It would be just as easy to do this project on a round mirror frame if that works better in your room.  Something like this .


If you don't have access to driftwood where you live, you could do a similar project with clothespins.
I love using them for projects with a farmhouse look.


Kirsty's Clothespin wreath, below (click link for tutorial) , could be made around a mirror. She used Washi tape on the clothespins. If they're old ones, I'd might just use them just as they are.

Hambly wreath - Photo 1

 A few years ago, I used my trusty glue gun to make a Button mirror . .  no beach required! This one was a little more time consuming but vintage buttons are fun. They're available everywhere, in shiny metals, unusual shapes and vintage colors. 


So, there you have it.  A simple project you can complete in an afternoon.  Or in an evening with a friend and glass of wine . . .


In which case, if all else fails, you can gather up your corks and make this!


Happy gluing!


This post is linked to:
Salvaged Junk Projects 421 at Funky Junk Interiors
Spring & Easter Blogger Link Party at Common Ground
Farmhouse Friday Link Party at The Painted Hinge
Flaunt It Friday at Chic On a Shoestring
Nifty Thrifty Sunday #328 at Nifty Thrifty Things
Happiness Is Homemade Link Party at The Painted Hinge
Craftastic Link Party at Sew Can Do

Related Posts Plugin for WordPress, Blogger...