Monday, September 29, 2014

Needle Felting 102: Dance Like Nobody's Watching

With my witch completed, I signed up for a second needle felting class with Kathleen Gerdes at Fiber College . . . this one on making a needle felted wall hanging rather than a 3-dimensional object. The class was called "Dance Like No One's Watching". Just the title alone made me want to sign up!

 
 Here is our inspiration piece, Kathleen's dancing woman, kickin' it up in her red shoes!


 The wall hangings can be made with tabs to hang on a dowel or branch, or with a hidden casing on the back for hanging.


There was no pattern - just the inspiration piece - so each of our completed dancing ladies was unique.  After just three hours on a beautiful September afternoon, here we are with our finished products.
 

Here's my wall hanging; I'm really pleased with it. It's already living on my bedroom wall as a daily reminder not to take life too seriously . . . and dance while I still can.


"Life isn't about waiting for the storm to pass, it's about learning to dance in the rain."
(in red shoes, of course!)


And here is Kathleen, who turned us into fiber artists in no time!
 
 This is another of Kathleen's needle felted wall hangings. This one is on display at Port Fiber, a "laniferous and splendiferous fiberarts shop" in Portland, Maine, where Kathleen teaches.


And here we are, Kathleen and I . . .accidental neighbors here in Falmouth, and now, fiber friends!


If you've never tried needle felting, you might want to give it a try. . . so much fun and neither difficult nor expensive to begin. There are lots of ideas on Pinterest to get your creative juices flowing.
 
 
I hope you dance!
 
 
This post is happily linked to:
Metamorphosis Monday at Between Naps On the Porch
Inspire Me Monday at My Uncommon Slice of Suburbia
Show & Share Tuesday at Coastal Charm
Inspire Me Tuesday at A Stroll Through Life
Wow Us Wednesday at Savvy Southern Style
Tablescape Thursday at Between Naps on the Porch
Show & Tell Friday at My Romantic Home
 Feathered Nest Friday at French Country Cottage
Craftastic Monday at Sew Can Do


Monday, September 22, 2014

The 150 Project #4: Tired of Rubber Chicken?

Posting my progress on the "150 Project " (my goal weight on Weight Watchers) is my way of keeping myself honest, tracking progress, and, just maybe, inspiring others because...if I can do it, anyone can!

This recipe is the best thing since sliced bread. No more dry baked chicken breasts at our house. We tried making them exactly as written and the chicken came out perfect . . . so moist. In case there are other women out there who somehow missed this trick for cooking chicken, I wanted to share. Delicious!
 
 
How To Cook Moist & Tender Chicken Breasts Every Time

Ingredients

1 to 4 boneless skinless chicken breasts, of similar size
Salt and freshly ground black pepper
1 tablespoon olive oil, unsalted butter, or combination of both 
Any seasonings you like (we used garlic)  

Equipment

Heavy Mason jar or wide drinking glass
Wide (10-inch) sauté pan with lid
Tongs or spatula 

Instructions

  1. Flatten the chicken breasts: Pound the chicken breasts to an even thickness with the bottom of a wide jar or glass. You can also (carefully!) use the handle of a heavy chef's knife.
  2. Season the chicken breasts: Lightly salt and pepper the chicken breasts. Add seasonings.
  3. Prepare the pan: Heat the sauté pan over medium-high heat. When it is quite hot, add the olive oil (or butter, if using). Swirl the pan so it is lightly covered with the olive oil.
  4. Cook the chicken breasts for 1 minute without moving: Turn the heat to medium. Add the chicken breasts. Cook for just about 1 minute to help them get a little golden on one side (you are not actually searing or browning them).
  5. Flip the chicken breasts: Then flip each chicken breast over.
  6. Turn the heat down to low: Turn the heat to low.
  7. Cover the pan and cook on low for 10 minutes. Cover with a tight-fitting lid. Set a timer for 10 minutes, and walk away. Do not lift the lid; do not peek.
  8. Turn off the heat and let sit for an additional 10 minutes: After 10 minutes have elapsed, turn off the heat. (If you have an electric stove, remove the pan from the heat.) Reset the timer for 10 minutes and leave the chicken breasts in the pan. Again, do not lift the lid; do not peek.
  9. Remove lid and take temperature: After the 10 minutes are up, take the lid off, and your chicken is done. Make sure there is no pink in the middle of the chicken breasts. If you want to be absolutely sure it is cooked, you can use an instant-read thermometer to check (the chicken should be at least 165°F). Slice and eat. Store any leftovers in a covered container in the refrigerator.
 
As Weight Watchers, we eat lots of chicken breasts at our house and often prepare them in advance to use on salads all week. I'm glad to have finally learned how to cook them!
 
Enjoy . . .


Today's "150 Project" Stats:
Weight - way over my goal after summer, but back on track
Exercise - 4 x week with trainer Ben at Body by John
Muscles - sore but stronger!
 

Friday, September 19, 2014

Needle Felting 101: Halloween Witch

I took two needle felting classes at Fiber College with felter-extraordinaire, Kathleen Gerdes (who just happens to live in the same town as me, though we had never met). The first class taught us how to felt in 3-D to make figures. We each made a pretty scary looking Halloween witch.


I've never done needle felting before and was so excited to see all that you can do once you learn some basic techniques. I love these pumpkins (and wormy apple!) that Kathleen made. They would be a great way to use up little bits of leftover wool batting.


Kathleen taught both of the felting classes at Fiber College; she also teaches needle felting at Port Fiber on Cove St. in Portland (right behind the U-Haul building on Marginal Way).
 

Not many materials are required for needle felting. You need some wool batting . . .
 
in whatever colors you want to use for your project.

You also need a foam felting pad and a few needles and you're good to go . . . at least for a beginner like me.

The actual felting was easy and all that pounding was a great stress-reliever!

The witch was basically done by shaping the wool in our hands and then needle felting (punching) it. You even bind the pieces together (e.g. head to body) by repeatedly punching the wool where you want them to join. You add additional colors the same way.
 

 I can do this!!!
Here's my finished witch . . . wart and all.
 
 
One caution: felting needles are very sharp, as most of us "newbies" found out the hard way.
 
I saw a cute idea for storing the needles safely on Pinterest so made a final stop at the dollar store and . . . voila!
photo courtesy of Pinterest at this link
In less than three hours, here is the Fiber College group with our finished witches.
 

This is my kind of project . . . fast and fun. I've already been to Port Fiber to ogle the wool and buy needles. I also bought two books chock full of felting projects.
 
Thanks, Kathleen . . . I can't wait to get started!


p.s. Here are links to two posts and photos of Fiber College from two fellow FC bloggers...hope you enjoy them. Nan's post is linked here and Gale's here. It's interesting to read different takes on the same event. Loved Gale's description of Fiber College as "quirkily wonderful" . . .perfect!

This post is felted to:
Party Junk at Funky Junk Interiors
Show & Tell Friday at My Romantic Home
Motivate Me Monday at Keeping It Simple

Thursday, September 18, 2014

Chemo Scarf Pattern

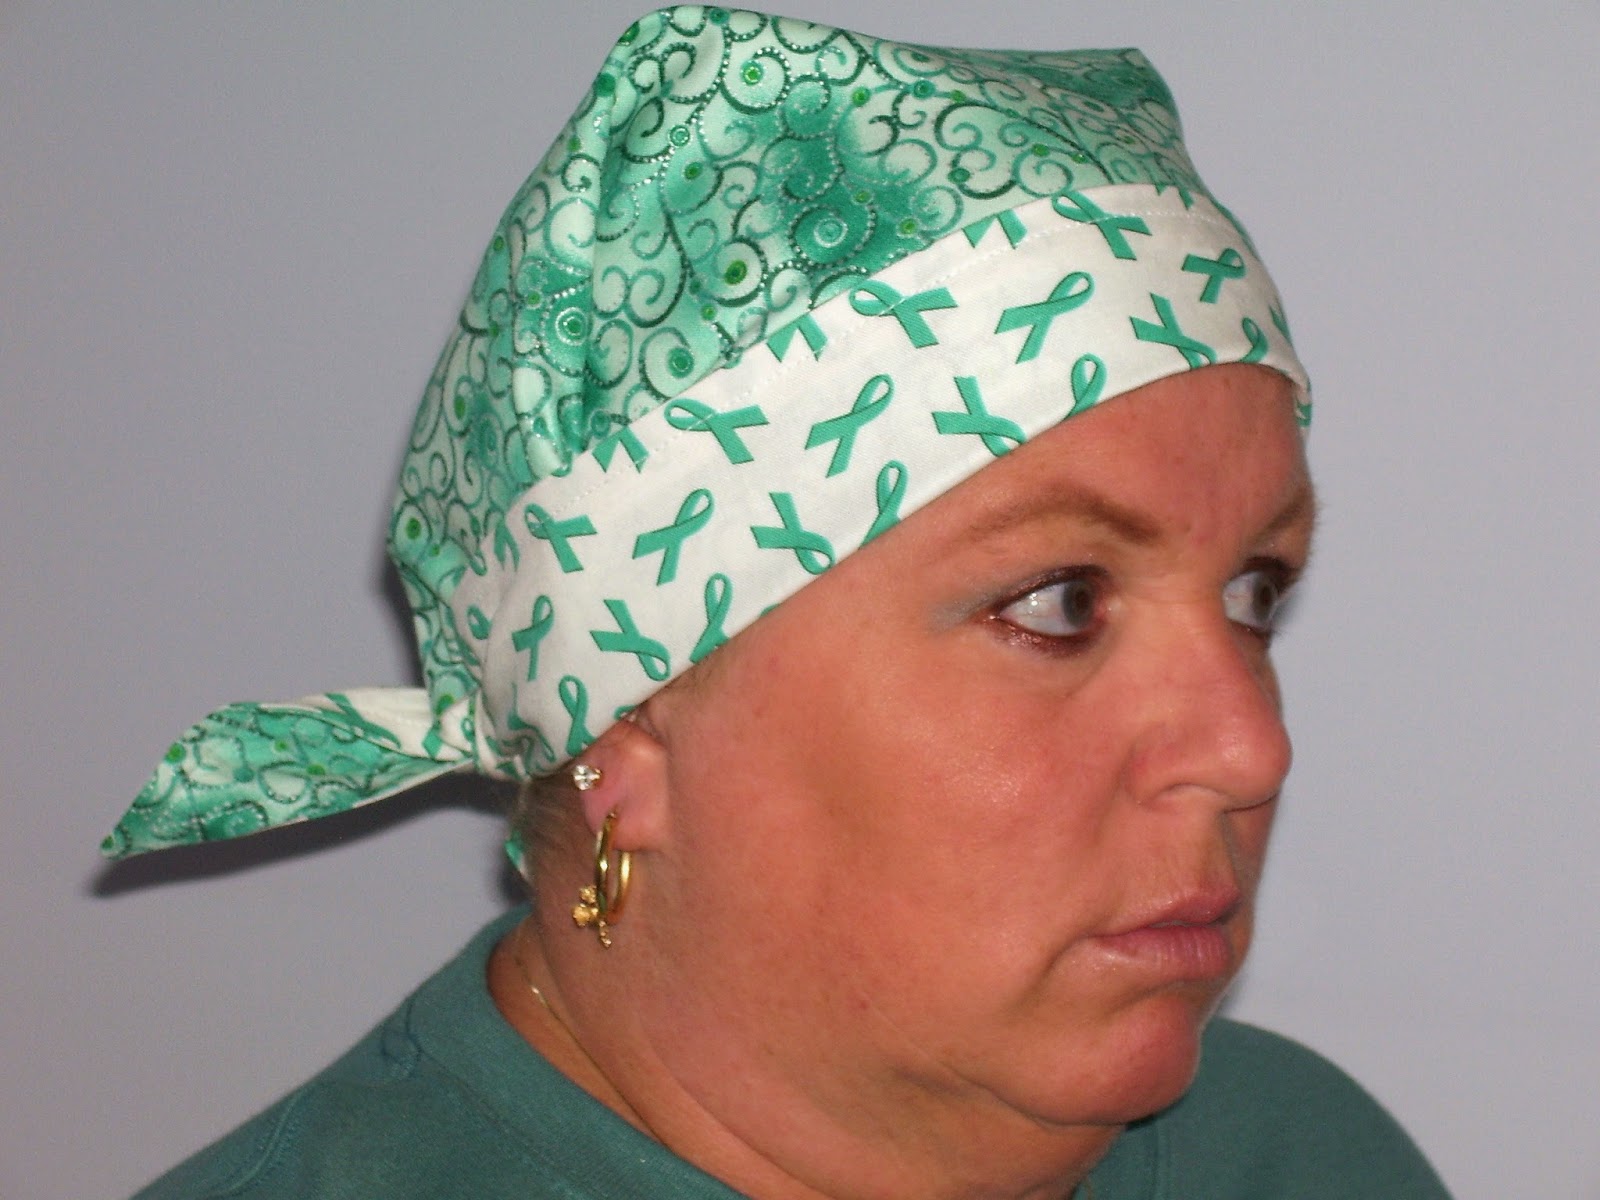
I was overwhelmed by the response to my September 14th post about sewing "Nancy's scarves" for cancer patients. So many of you have asked for the pattern that I'm posting it here.
Feel free to share.

Cut a pattern out of newspaper or craft paper. Pattern is an isosceles triangle 29-1/4" long on one side and 20-1/2" long on the other 2 sides. 5/8 seam is allowed in the pattern.
Here's my well-used pattern . . . coffee spills and all!
Since the scarf is reversible, for each scarf you will be will be cutting the pattern twice - once from each of two coordinating fabrics. Be sure to place on the fold of the fabric when cutting out.


Sew the two scarf pieces together, right sides together. Leave an opening for turning. Turn the scarf right side out and press. Topstitch 1/4 to 3/8 inch from the edge and you're done!


My sister was such a good sport about modeling for me!
Since Nancy was a 3rd/4th grade teacher, I made her scarves for every holiday. The kids loved them. Here she is in her Halloween scarf  . . . so many happy memories, yet my eyes still tear up.

Occasionally, Nancy would just wear this to make the kids laugh!
 
I don't have a pattern for the Mickey Mouse hat so we'll all just have to stick to sewing scarves!
 
If you would like to learn about ovarian cancer, you can read Nancy's story, in her own words, here.
Thanks to each of you for doing this in memory of Nancy and all of our "sisters" who have been touched by cancer. 
 
Happy Sewing!
 
 
 This post is gratefully linked to:
I Quilt at Pretty Bobbins
Needle & Thread Thursday at My Quilt Infatuation
Tutorial Tuesday at Hope Studios

Tuesday, September 16, 2014

Bookbinding 101

Anna Low, of Purplebean Bindery, is a very talented book binder. After attending one of her demos last year, I couldn't wait to take her full-day course on Coptic Book Binding at Fiber College.

 
It was a lot of fun but not quite as easy as it seemed.
Now I know why hand bound books can be expensive . . .
a lot of love goes into each one.


In order to be able to follow Anna's instructions, we had to learn some new terminology.
 like:
FOLIO:  folded paper...will eventually make 2 pages
SIGNATURE:  a group of folios bound together

A hand-bound book is usually made up of five or more signatures stitched together.


The paper for each folio must be cut exactly.


Then a minimum of three folios are put together to make each signature.


We bound each signature with colored rice paper, using acid free glue.

Once all off the signatures were assembled and the glue was dry, we punched them, using an awl.
Old phone books were used to both help align the paper and to protect the table beneath from all of our enthusiastic newbie punching.


We each brought old books to rebind. The front and back covers were removed with an exacto knife and the signatures sewn in. There are many types of bindings but the one Anna taught us, Coptic binding, is one of the oldest.


And, after eight hours, here is my finished book. Fussy me finished last but I was pleased with the result of my first attempt. Anna was a very patient teacher.

 
Anna is a creative book binder who often repurposes individual cereal and soap boxes to make playful mini-bookcovers using the commercial text and graphics. She also uses the covers of vintage children's books to rebind into blank books and journals. Perfect gifts for Boomers!
 
Artist Book titled The Year I Missed Campbell's
 
You can see more of Anna's work at her Etsy store, Purplebean Bindery.
 
A Bitty Polka Dot Journal with 365 Pages, One for Every Day of the Year
 
Her books are truly works of art.
 
I just went to JoAnn's with a 40% off coupon and bought myself an awl.
I think I'll be binding a few more books this fall . . .
thanks to Anna!


This post is coptically stitched to :
Tutorial Tuesday at Hope Studios
Show & Share at Coastal Charm
Tweak It Tuesday at Cozy Little House

Sunday, September 14, 2014

Sewing Scarves for Cancer Patients

This is the story of two amazing women who I met on the last day of Fiber College and a random act of kindness that has touched my life...and will soon touch the lives of many women with cancer.

For years, while my sister Nancy dealt with the side effects of ovarian cancer treatment, I sewed her scarves. Lots of scarves. It became my therapy as I supported her.  I wrote about Nancy's scarves on my blog at My Sister's Scarves. I hope you'll take a minute to click on the link and read her story.


The short version is that I made so many scarves Nancy couldn't possibly wear them all so we began making them to donate to the Maine Medical Cancer Center in Scarborough, where Nancy went for chemo, and the Cancer Community Center in South Portland. After Nancy passed away in 2010, I was left with bins of cut out scarves to sew. It became more than I had time to keep up with so I brought a bin of the scarves-to-be to Fiber College with me last week, hoping that some of the quilters there might be able to use the fabric. The bin sat on the quilting table for four days, and, at the Farewell Get-together on the last day, a woman named Kendra introduced herself. Let's call her  "Amazingingly Kind Woman #1".

Nancy's scarves
Kendra explained that she and a group of her friends from the Searsport area would like to complete the pile of scarves left in the bin and donate them to the Augusta Cancer Center. In the time it took me to finish my bread pudding (yummy!), Kendra had surrounded herself with interested sewers and was showing them the scarves. She actually had one on! I felt myself tearing up and had to walk outside for a minute. Thanks to Kendra, "My Sister's Scarves" would go on . . . and help other women like Nancy.

And it doesn't end there...
Nancy 2006
Another woman, Beverly from Medford, Maine, introduced herself and asked if she might have a cut-out scarf to use as a pattern so that she could make some to donate to women with cancer in the Dover-Foxcroft area. (Again with the tears and the dash outside to compose myself). To me, Beverly will always be "Amazingly Kind Woman #2".

Now I'm wondering if this might go viral . . . more and more of us sewing these simple reversible scarves for cancer patients.

Nancy's New England Patriots Scarf, Side #1
 
and Side #2   Go Pats!
A few days after I returned from Fiber College, Kendra forwarded this to me . . . her invitation to her friends to join her to sew scarves. (And check out the reference to moose hunting...this is Maine after all!)

Good Evening Ladies~~~
 
I am back and ready to do something!!! Bruce will be away moose hunting so I think it is time for a get together.
 
So on Wednesday September 24th  at 2:00 you are invited to our house.  We will be making kerchiefs for chemo patients.  I was given a box ~already cut out ~ so we need to sew them~turn them~hand stitch the opening ~press them~ and then top stitch them.  We need lots of hands~~it doesn't require any sewing skills.
 
I will have wine and appetizers.
Hope to see you all~~it will be a good time!!!
 
~Kendra

So this post is a great big THANK YOU to Kendra and Beverly, two very kind women who I was so fortunate to meet.
 

"Carry out a random act of kindness, with no expectation of reward, safe in the knowledge that one day someone might do the same for you."
~Princess Diana
 
  
 This post is linked to:
Sew Darn Crafty at Sew Many Ways
 
In loving memory of my sister, Nancy Smith Tufts
1952 - 2010

 
Relay for Life 2010

Nancy at Searsport Shores, Site #22, Aug. 2007
 
Related Posts Plugin for WordPress, Blogger...